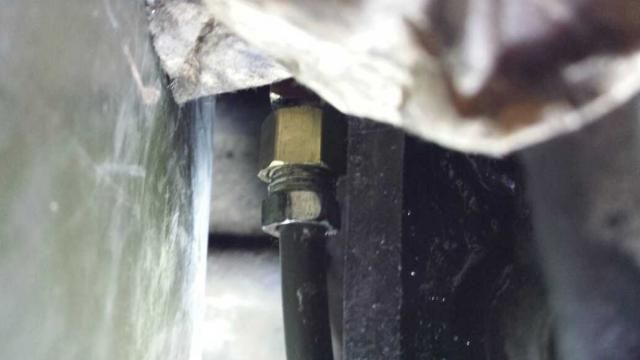
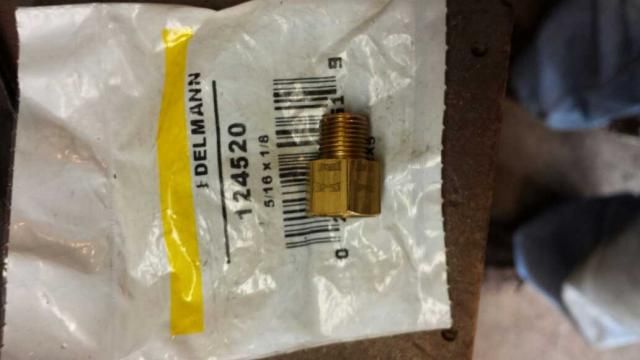
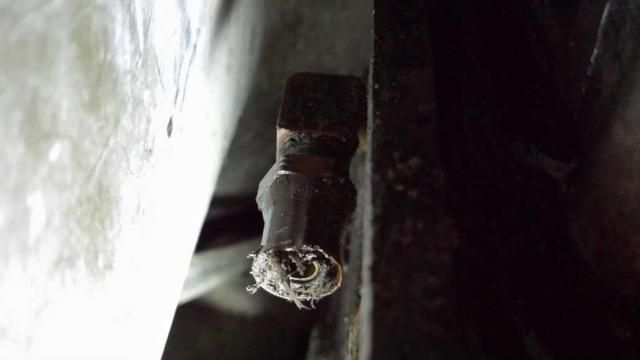
Here is the fitting you will need. And also posted are the before and after pictures. (I was only able to see the fitting by taking a picture with my cell phone)
 |
 |
|
|


 Private


Here is the fitting you will need. And also posted are the before and after pictures. (I was only able to see the fitting by taking a picture with my cell phone)
Private
Note: I also removed my valve cover to replace the valve cover gasket at the same time. Not sure if this really helped or not.
So, you're finally fed up with that small puddle of oil under the engine that magically appears a few hours after parking it. So you're determined to replace that oil tube. Here is my step by step procedure.
Step 1: get a yoga mat and practice doing the "superman" yoga pose. Because you will be doing this same pose while balanced over the fender.
2. I recommend removing 4 of the body mount bolts and jacking up the front of the cab to gain a little more access. Do a good job so your fingers dont get pinched back there if the jack falls down. You might also be able to remove the engine mounts to gain a little more access.
3. Once you're able to get your fingers back there. Rip out that old rotten hose. Then use a socket to uncsrew the end of the rotten hose fitting from the elbow fitting. You will want to leave the elbow fitting alone.
4. Install the 1/8 pipe to 5/16 flair adapter. This is easy since you can use a socket and an extension.
5. Make a section of brake line with the 5/16" flair fittings at each end. Finger tighten onto the motor the best you can.
6. Take a 1/2" crowfoot and grind the outside down so that you will fit back there and allow you to get a partial turn on the flair fitting. I was only able to turn it a few degrees at a time and had to flip the crow foot over every time. WHen it gets tight you will need a few socket wrench extensions and a universal joint to finally tighten it.
7. Take a break
8. Go back and finish step 6. And then put the body and motor mounts back together.
9. If you took the valve cover off, make sure all the rocker arms are aligned up with the top tree thing that keeps them lined up. More than likely you would have bumped them while reacing behind the engine.
 Civilian
so true and hilarious. Where are you in the states? I am in Indiana
Time is irrelevant.
 Private
this replaces the rubber line with a steel line right?
 Sergeant

I've posted this before, but it's probably worth repeating.
My son and I found a very easy method to change out this oil line.
1st remove line at oil sending unit and turn line toward drivers side until rear fitting is spun off.
2nd take brass 90 fitting only and screw it back into rear of head, tightening it so that it points down at the sending unit.
3rd loosely attach new line to fitting on back of head, (hand tighten as tight as possible). Do not attach oil line at sending unit.
4th slide the correct size ratcheting box wrench (use a small, short box wrench) over the oil line at the sending unit side and slide it up to where the oil line meets the 90 elbow at rear of head. Slide over the nut at the end of the oil line and ratchet it until it gets tight. Can't move the ratchet box wrench much, but a few clicks at a time will tighten the line perfectly.
5th slide wrench back down over oil line, remove it and connect and tighten at the sending unit side.
This method made this nightmare job almost easy. Laying on top of the motor is the hardest part. This method worked for me and have had no problems with the line ever.
militarypotts Spec/4 Military Police, Vietnam Era, "Does the noise in my head bother you? Welcome to the Twilight Zone!"
 Corporal

I was all set to do this last week. I was replacing my valve cover gasket and thought I'd go ahead and replace the oil tube with a hard line while I was there.
I bought some brake line with fittings and a bender. Flare kit and cutter just in case.
I crawled under with it running to see if I could spot where my many leaks are coming from. The bottom fitting on the tube was loose. Tightened it up to see how that'd work and had to use a 9/16 wrench... Everybody on here has been saying 1/2 wrench for that fitting.
Shut it off and pulled the bottom end of the hose off. It looks like somebody has replaced the hose and at least one elbow. Now has a female fitting on the hose. Didn't get a look at the top end of the hose but guessing they changed both elbows... why change just one?
I tightened it back up and replaced the valve cover gasket.
I'll get new elbows and go back with the hard line as planned.
Changing the valve cover gasket dropped my daily oil leakage down from 1.25 to 0.5 quarts... that's driving about 30 miles a day.
Basic Trainee
I had the horror of the fitting breaking off the head. The dealer from whom I bought the truck installed a replacement rubber line that couldn't take the pressure and it blew ( my truck had relief valve issues). He really tightened up the line, so much so that the fitting broke off when I attempted changing the line.I had to pull the engine to drill out the broken stub. I had to remove the front clip to pull the engine- it's heavy and tall, especially with it's transmission attached, we couldn't get it up and out over the radiator support. When I was removing the front clip, I had a weld nut break free in an inaccessible area, despite penetrant soaking and careful attention. One thing led to another... jeez. it's still apart almost a year later in my driveway.
Point is, if I could do it all over again, I'd accurately locate and cut a neat 2" x2" or so access hole to get at the fitting, and make up a nice neat hole cover when the repair is finished. Make it look like factory. Four neat screws, caulking, etc. Given the nature of the oil line, it should be accessable anyway!
The whole oil line thing is a nightmare! ( I replaced it with a steel line).
Private 1st Class

Mine had a access hole cut in the firewall when I got it. A three sided cut so the metal could be bent up to get to the fitting. Duct tape was put over it to hold it in place. I don't think it's a factory option as the cuts are rough and not square!!!")
DaveJ
Corporal
Its not necessary to cut any holes. i did mine when i had the stock engine. no big deal.
 Posting Permissions
| Site Upgrade, Design Modifications & Administrative Support by: Palm River Enterprises LLC, IT Solutions President: Tom King, User ID=teking |
This site is owned and operated by: M715 Zone, LLC President: Jon Schmidt, User ID=brute4c |
|
Copyright Notice: This web site is subject to the protection of the copyright laws of the United States and other countries. Except for Personal Use Only, you may not modify, copy, distribute, transmit, display, perform, reproduce, publish, license, create derivative works from, transfer, or sell any information obtained from any part of the M715 Zone website without the prior written permission of M715 Zone, LLC. Written permission can only be obtained by contacting brute4c@m715zone.com |
 |

 Reply With Quote