Could anyone tell me when brakes are bled correctly how far from the floor is normal for the brake pedal to be. Have good brakes but pedal seams to be close to the floor when engaged fully, about 1 1/2 inches and when not applied about 4 inches.
 |
 |
|
|

 Civilian

Could anyone tell me when brakes are bled correctly how far from the floor is normal for the brake pedal to be. Have good brakes but pedal seams to be close to the floor when engaged fully, about 1 1/2 inches and when not applied about 4 inches.
 Corporal

My truck has very little freeplay. Although your brakes might be completely bled its possible the shoes need adjusting, they arent self adjusting and excessive shoe to drum clearance translates into long pedal stroke.
68 M-715 MVPA #2710
 Corporal
Don't forget to adjust the push rod free play at the pedal. The adjusting bolt is on top of the pedal assembly.
Wart Hog
Live like you will die tomorrow. Dream like you will live forever!!!
 Private 1st Class

Most likely the brakes need adjusting at the wheels. These brakes are not self-adjusting, so occasionally you need to crawl under there with a brake spoon and tighen them up. Unless you changed master cylinders, you shouldn't need to adjust the master cylinder push rod. If the brake shoes are not adjusted correctly, you could pull to one side, or the shoes will wear unevenly, , . that is why you want to adjust at the wheels first. It sounds like from your measurements that they are needing adjustment, mine is about 3 inches or so fully depressed, and around 6 or so with no pressure. The pedal should drop less than an inch before you feel drag on the brakes.
 Grand Poobah

From the -34 manual, Chapter 16, section 16-6:
16-6. Brake Pedal Adjustment
There should always be at least 1/2” free pedal travel before the push rod engages the master cylinder piston.
This adjustment is accomplished at the brake mounting bracket.
To adjust free pedal travel, first loosen the adjusting bolt locknut. Turning the adjusting bolt in (clockwise) decreases the amount of free pedal travel, turning the adjusting bolt out (counterclockwise) increases the amount of free pedal travel.
Too great a free pedal travel prevents the push rod from bottoming against the master cylinder piston, giving excessive pedal travel before brake application. Not enough free pedal travel will prevent the primary cup in the master cylinder from clearing the by-pass port when the piston is in the released position. This will destroy the compensating action of the master cylinder for expansion and contraction of the fluid in the system due to temperature changes.
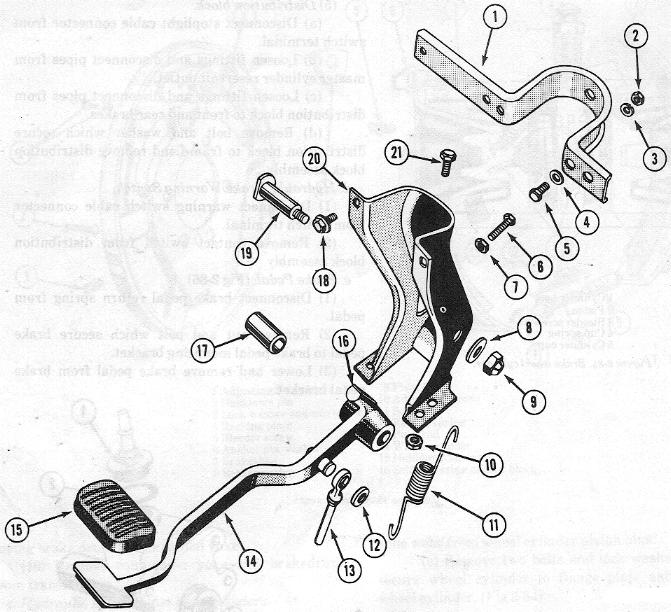
1. Brace 2 Nut 3 Lockwasher
4 Flat washer 5 Bolt 6 Adjusting bolt
7 Locknut 8 Flat washer 9 Nut
10 Nut & washer assembly 11 Retracting spring 12 Washer
13 Master cylinder push rod 14 Brake pedal 15 Brake pedal pad
16 Brake pedal bumper 17 Bushing 18 Capscrew
19 Brake pedal shaft 20 Brake pedal mounting bracket 21 Bolt
 Private 1st Class
It is a said, check the manual!
Private 1st Class
Jon, . could you also post the manual instructions for adjusting the brakes themselves? We are not looking at the whole picture if we are only looking at adjusing the pedal free-play. Thanks, . .
Grand Poobah
No sweat...
16-8. Brake Adjustment
When the brake linings become worn, effective brake pedal travel is reduced. Adjusting the brake shoes will restore the necessary travel. Before adjusting the brakes, check the spring clip nuts, brake dust shield to axle flange bolts, and wheel bearing adjustments. Any looseness in these parts will cause erratic brake seizure. Also check that the brake pedal has 1/2” free travel without moving the master cylinder piston.
Centralize the brake shoes in the drums by depressing the brake pedal hard and then releasing it. Since the brakes are of the self-centering type, they require no anchor adjustments. Hoist all four wheels off the ground and adjust the brakes according to the procedures given in paragraph 16-9.
Figure 16-8. Brake shoe adjustment.
1 Adjusting tool
16-9. Brake Adjustment (Star Wheel)
Adjust the brakes as follows:
a. Remove the adjusting hole dust clip from the back of the brake backing plate. See figure 16-8.
b. Use Brake Adjusting Tool to turn the star wheel. Raise the handle of the tool to tighten the shoes against the drum.
c. When the brake shoes are tight against the drum, turn the star wheel in the opposite direction until the vehicle wheel just rotates freely without brake drag.
d. Repeat the above procedure for all four wheels.
I will note here that the way that many do it is a little different but easy to understand...since you want all the brakes to be equal in adjustment...tighten one set all the w tight...then back it off untill the vehicle wheel just rotates freely without brake drag while counting the number of clicks one has backed that one off.
Go to the other wheels and tighten all the way, then loosen them the same number of clicks.
All wheels are even then...a good way to do it and much easier than setting each one individually by feel.
Civilian
Just got back from out of town. Thanks to all for the advice. Will adjust brakes.
 Posting Permissions
| Site Upgrade, Design Modifications & Administrative Support by: Palm River Enterprises LLC, IT Solutions President: Tom King, User ID=teking |
This site is owned and operated by: M715 Zone, LLC President: Jon Schmidt, User ID=brute4c |
|
Copyright Notice: This web site is subject to the protection of the copyright laws of the United States and other countries. Except for Personal Use Only, you may not modify, copy, distribute, transmit, display, perform, reproduce, publish, license, create derivative works from, transfer, or sell any information obtained from any part of the M715 Zone website without the prior written permission of M715 Zone, LLC. Written permission can only be obtained by contacting brute4c@m715zone.com |
 |

 Reply With Quote