Page 5 of 7 FirstFirst 1234567 LastLast
Results 41 to 50 of 65

Thread: Recreating 10254. (with lots of questions)

  1. #41

    Default

    On that (12v conversion) note, here is what I think might be my solution for retaining the Sparton turn signal switch/early production date look:


    This is a Sparton switch from a Willys application. I can get the part number off of the back if anyone is interested.

    The REALLY neat thing about it is this:


    It has a rubber wheel that rides against the back of the steering wheel for turn signal cancel function. I'm already the idiot who rides around in his army truck with the turn signal on (constantly forget about it) so this, plus moving the heavy duty flasher relay into the cab behind the dash (where I can hear it) should resolve that.

    I'll probably end up using the 2-stud bracket as designed on the switch, which will require a slight modification to the column. I'll use hose clamps for a test period first, though, before I commit to modifying the column.

    I'll also need to defeat the remainder of the chrome on the lever so I can paint it appropriately.
    .
    keith.

    [SIGPIC][/SIGPIC]
    www.zuffenhaus.us

  2. #42

    Default

    OK, more on that Sparton turn signal switch (because I'm fascinated with it)


    Here is what it looks like without skin:


    - and here is a better angle of the wheel mechanism - you can probably discern how it operates by looking at it. (lever in Right Turn position - wheel will roll lever back to center when steering wheel is turned anti-clockwise.)


    This is after I disassembled it, cleaned it up and re-assembled it. (I'll be doing this again to paint and lube it)


    Since I'm going to be welding studs to the column for this component, I have to clarify an aspect of my steering wheel installation that did not affect anything until now: when I removed the Grant wheel and re-installed the stock M715 wheel, I ended up with both an intermittent horn function (depending on where the wheel is turned) and a spring-effect, wherein I can push the wheel toward the column a couple of inches as if on a spring.

    I'll need to resolve both before I position the turn signal switch and make the studs permanent.


    Another concern: what is the appropriate angle for the turn signal switch? 9 o'clock? 11 o'clock? Once it is installed, it stays there, so I want that clarified before I proceed.


    And another question - this Sparton switch has no provision for Hazard Lighting. Did the M715 Sparton switch have such a provision?


    And lastly - the bulb illumination window on this Sparton switch is BLUE. Is this correct for M715?
    .
    keith.

    [SIGPIC][/SIGPIC]
    www.zuffenhaus.us

  3. #43

    Default

    and here is the part number for this switch (photo taken prior to disassembly and cleaning)

    MODEL SCS -3R

    .
    keith.

    [SIGPIC][/SIGPIC]
    www.zuffenhaus.us

  4. #44

    Default

    - and just in case anyone else decides to do this mod on their Kaiser in the future, here is some wiring info I ran across on the internet:


    John, I took my old Sparton apart tonight and checked wires. Mine's a model SCS 3R (self cancelling switch). Here's the actual Sparton color codes:

    LF=yellow
    LR=light blue

    RF=black
    RR=orange

    Brake=purple or brown, mine is so old it's hard to tell...

    Load=white
    Pilot=black

    Having 2 black wires makes it hard to tell what's what but that's how mine came. Also you'll note that some of my color codes change between the Sparton and the Jeep wiring itself. Don't know if that's original but probably is. Here's how things crossed over in mine:

    1) LF = single yellow wire (Sparton: yellow)
    2) LR= single green wire (Sparton: light blue)

    3) RF = dark grey wire in 3-wire plug (Sparton: black)
    4) RR = orange wire in 3-wire plug (Sparton: orange)

    5) brake switch power = light grey wire in 3-wire plug (Sparton: purple or brown)

    6) flasher load: white wire to flasher socket (terminal "L") (Sparton: white)
    7) flasher pilot: black wire to flasher socket (terminal "P") (Sparton: black)

    +12V to terminal "X" in the flasher socket.

    So the best way to check all this is to take the switch apart if you have to and check it with a meter to be sure you get things hooked up right!
    Baby John
    in Mendenhall MS
    with an 84 CJ7....


    This info was pulled from this thread in the Early CJ5 Forums

    I'll report as to how well it works for the M715 when I install.

    .
    keith.

    [SIGPIC][/SIGPIC]
    www.zuffenhaus.us

  5. #45
    Join Date
    Sep 2010
    Location
    Middleville, mi.
    Posts
    1,290

    Default

    Quote Originally Posted by eimkeith View Post
    Also, you guys are using this with otherwise (except MC of course) stock brake systems, correct?
    I used a hydroboost from a 90's vintage Chevy Astro van with 4 wheel disk brakes. I used the master cylinder that was attached to that hydroboost too.

    I did convert the stock brake cylinders to Ford E350 brake cylinders. I also replaced the worn stock shoes with Dana 60 shoes modified as posted in a thread on this site.

    Properly adjusting the stock brakes makes a big difference too.

    My truck now stops better than I was hoping for. It stops as good as my more modern Duramax truck.

  6. #46

    Default

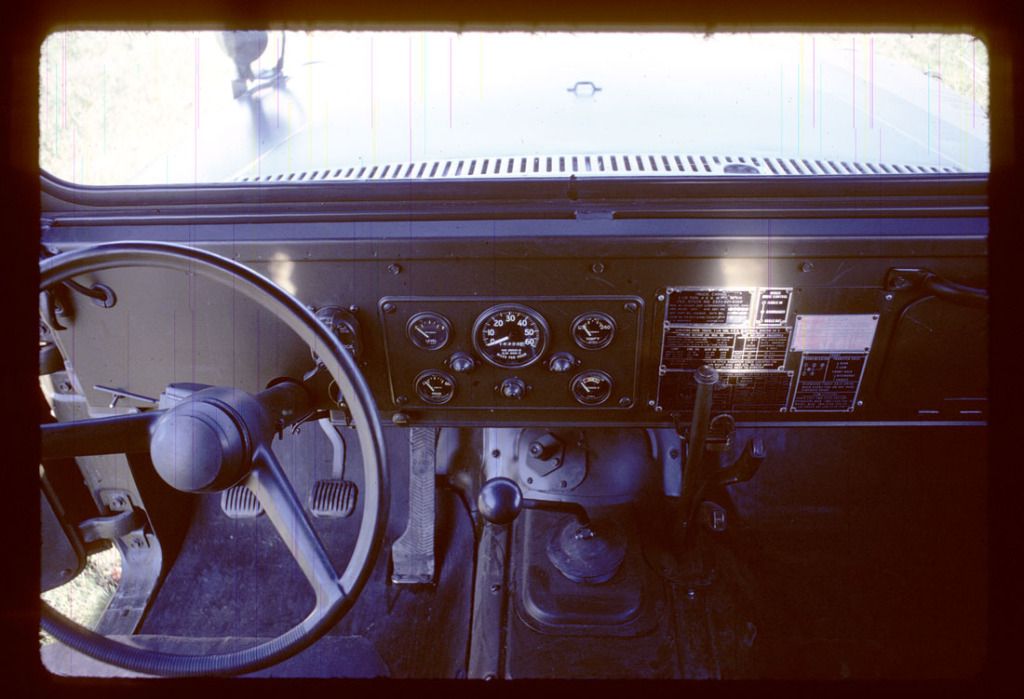
    OK, according to this vintage photo by Don Cavey, the turn signal switch is installed at a bit of an angle:


    Don, did you adjust it to suit, or do you recall if it was like that when you were assigned the truck?

    I'm trying to determine what angle it was mounted at as-delivered, before I install the SCS-3R (which will be fixed in that position.)
    .
    keith.

    [SIGPIC][/SIGPIC]
    www.zuffenhaus.us

  7. #47
    Join Date
    Jan 2011
    Location
    Fernandina Beach, FL
    Posts
    3,689

    Default

    Quote Originally Posted by eimkeith View Post
    OK, according to this vintage photo by Don Cavey, the turn signal switch is installed at a bit of an angle:


    Don, did you adjust it to suit, or do you recall if it was like that when you were assigned the truck?

    I'm trying to determine what angle it was mounted at as-delivered, before I install the SCS-3R (which will be fixed in that position.)
    My recollection is that I did not adjust the turn signal switch. Also, notice the horn button and the lack of warranty or safe driver decals on the dash. I truly don't ever remember either sticker but that may have been a unit-specific thing.

    Somewhat OT, my computer has a problem with scans. I hope to "Fix" that problem in the next year by using another scanner. I also have a Nikon slide scanner and will be re-scanning my slides over the next year. I promise to post more pictures when I get back to the US. Thanks for digging up that photo! I only wish I had taken more. I always loved the M715 and finally have gotten one. Just can't wait to get it reliable and start daily rides on the local roads.

    Back to the original topic now

  8. #48

    Default Recreating 10254. (with lots of questions)

    I'm enjoying my daily rides on local roads, although hearing the XLs singing at 35mph was disconcerting at first


    keith.

    (sent from my rotary dial phone.)
    .
    keith.

    [SIGPIC][/SIGPIC]
    www.zuffenhaus.us

  9. #49

    Default Recreating 10254. (with lots of questions)

    BTW, I really appreciate your photos.


    keith.

    (sent from my rotary dial phone.)
    .
    keith.

    [SIGPIC][/SIGPIC]
    www.zuffenhaus.us

  10. #50
    Join Date
    Jan 2011
    Location
    Fernandina Beach, FL
    Posts
    3,689

    Default

    Quote Originally Posted by eimkeith View Post
    I'm enjoying my daily rides on local roads, although hearing the XLs singing at 35mph was disconcerting at first
    keith.
    On the other side of that coin, I prefer the sound of the transfer case at 35 MPH. It surely reminds me of the years driving the 5/4 whilst in the army. Music~~~~

Posting Permissions

  • You may not post new threads
  • You may not post replies
  • You may not post attachments
  • You may not edit your posts
  •  


Site Upgrade, Design Modifications & Administrative Support by:
Palm River Enterprises LLC, IT Solutions
President: Tom King, User ID=teking
This site is owned and operated by:
M715 Zone, LLC
President: Jon Schmidt, User ID=brute4c


If you have any suggestions, comments, problems or questions, contact:  brute4c@m715zone.com
Use of this site means you understand and agree to our TERMS OF USE

Copyright Notice:
This web site is subject to the protection of the copyright laws of the United States and other countries. Except for Personal Use Only, you may not modify, copy, distribute, transmit, display, perform, reproduce, publish, license, create derivative works from, transfer, or sell any information obtained from any part of the M715 Zone website without the prior written permission of M715 Zone, LLC. Written permission can only be obtained by contacting brute4c@m715zone.com

Copyright 1998-2024