


John's Pics
I purchased my M715 in late May 2000. It is labeled as M715 w/ winch
#35742.It had 16700 miles on it and zero rust and it had 2 passenger side
troops seats, no cab top (but had cab bows and frames) and a spare engine
for parts. The truck had belonged to the Cowiche Fire Department here in
Yakima County. They sold it to some poor guy that didnt have a clue what
to do with it or fix it, who in turn sold it to the guy I bought it from.
The Fire Department had kept things all stock except for the mirrors
and the spark plug wires. The things they messed up on the truck were,
an eight inch hole in the passenger side of the tailgate and they removed
the mil spec lenses on the turn/marker lights and screwed on plastic full
lens covers with no sealant (rusted the bulbs to the sockets) and they
removed the blackout drive light and blackout brake light but were nice
enough to leave one of the mounting brackets (B/O brk). After they sold
it the cab top dry rotted, but the gentleman that bought it from kept a
piece of plywood over the cab to keep the snow out.
I knew that wanted it for a long time before hand so I found myself
rat-holein' pieces and parts. The day I got it home I took off the stock
turn lights and applied modern MILSPEC full lens turn signals. I also mounted
the blackout drive light and replaced all of the body reflectors. I replaced
all of the gearbox and differential fluids. Found out why the truck said
it had a winch but didn't. What was left of the PTO was still in the transmission.
It was the Army that did this, not the fire department. I could tell by
the paint and front bumper.
I found a few days later that the brakes needed to be done BAD, I was
counting on that and I had new wheel cylinders and a master cylinder rebuild
kit, plus a gallon of silicone brake fluid and denatured alcohol on hand.
What I didn't count on was a run out drum assembly and zero brakes in the
passenger rear. One of the previous owners had soldered the line shut and
shoved paper towels in the wheel cylinder. He also tossed all the hardware.
I took this time to do the wheel bearings as well.
With the brakes fixed and bearings adjusted it was time to beg the
wife for some money for a cab top, Beachwood Canvas makes a real nice vinyl
top. I got a hold of the Cowiche Fire Chief and told him I was the proud
owner of their old rig. He told me to come up and get some "spare parts"
they still had in storage. What I found was pretty good: spare tire, cargo
cover, end curtain, water pump, 2 sets tire chains and a brand new T-98
in a crate.
The next step of the project took me to installing military antennas
and removing the passenger seat and the battery box. I mounted the battery
box in the bed and installed a passenger seat out of a deuce an a half,
so I could fit 3 in the cab. Then I mounted the radios under the passenger
seat and added all new seat belts. Both seats where recovered with OD green
vinyl covers. I noticed from passed experience that all the neighborhood
cats love to use canvas covered seats for urinals.
I tossed the distribution box in favor of a MIL-SPEC solid-state flasher
and new turn signal switch. I mounted a master battery switch in he hole
where the PTO shifter used to be. I found that a .50 cal ammo can with
out a lid fits real nice in the storage under the bed. I mounted 3 on one
side and 2 on the other. They are mounted on top a 2X4 and can be pulled
out like a drawer for easy access. I also had room for the bottle jack
and a couple of wooded blocks. A radiator recovery bottle was added as
well.
With winter setting in I installed a block heater. A hand throttle
was installed and I fixed up the troop seats. For cargo bows I used 2 1/2
ton bows and stavits (I had to cut the cross pieces down to fit). I also
made a ridge pole.
I then installed a 30,000 BTU hot water heater from a 2 1/2 ton under
the dash on the passenger side and made defroster scoops using 2 ABS pipe.
I had to cut the heater box down a little to get it to fit, but it comes
real close to using the original knock-outs. I used a .30 cal ammo can
for an air box on the engine side of the firewall. The hole in the tailgate
was patched and covered with these big yellow and red reflectors that the
Army seems to be putting on the back of a lot of their rigs. I asked a
G.l. what they were for and he said "to keep people from rear-ending their
camo vehicles. Civilians seem to have a hard time seeing camo vehicles
in the city.
I slid around a little that winter on bald Goodyear Custom Extra Grip
tires and vegged a little waiting for the weather to get warm. This gave
me time to sit down in front of the computer and make out wiring diagrams
and download info from the zone.
In the spring (2001) the IRS came through for me and I got new NDT
Denman tires and new shocks. I did a little work under the hood with spark
plug wires and rocker arm cover gasket. I also got a deal on some cans
of bed liner so I did all the floorboard area of the cab minus the trans
cover and I coated the inside of the bed minus the center of part of the
floor section (aft corners, wheel wells, sides, and under the battery box
and tool box are coated). I also installed some locking hubs.
This summer I repainted the truck OD semi gloss 24084 and applied Navy
markings for Special Boat Unit 11 Special boat unit 11 runs (?used to run?)
PBRs (riverine warfare), I wanted to camo it but the wife said no, so the
truck is OD and the bed is camo. Hey I make the money, but the wife gets
to budget it. It was an easy paint job. I left the white paint on prepped
and primed over it (more layers of paint is better with semi-gloss or flat
paint). The fire department was nice enough to leave the inside of the
cab 24087 OD semi-gloss all I had to do was rub out some white over spray.
I 'm not really hot on mud flaps but installed some anyway to protect that
fresh coat of paint this winter. Also added a piece of aluminum expanded
metal to the grill guard, the bridge plate holds it on one side and a couple
of J bolts hold it on the other.
Now that its done GETTIN PRETTY, its time to use the beast!!! BRING
IT ON......MR. WINTER. I like to restore military rigs, but not for shows
and such, they were meant to be used.
Future projects on my list are: an oil cooler for the engine. Moving
the rear drive shaft to the upper rear output on the transfer case. I would
also like to make or get a hold of a vinyl cargo top and end curtains.
I love this truck, but from time to time I miss my little M38A1 and
M100 trailer. I know my wife misses the Al. She refuses to drive the M715,
we have two kids and a dog. I think shes just afraid of where shes going
to have to sit. Hey me: two kids and a Basset Hound fit real nice in the
cab! Ill stick it out. I like having something that is pretty rare and
gets people looking and asking questions. It use to be Hey what are all
those funny looking lights for on that CJ5. Where did you find those
funny tires for that CJ5. Now its Wow! Where did you get that Hummer
DA!!!
I would like to thank you now for putting my rig on the zone and for
all the advice and information Ive gained from you and others.
John
P.S. As you have noticed 1 mentioned 2 1/2 tons a lot. It is amazing
just what you can find on one of those trucks that can be utilized in some
way on the M715 family.
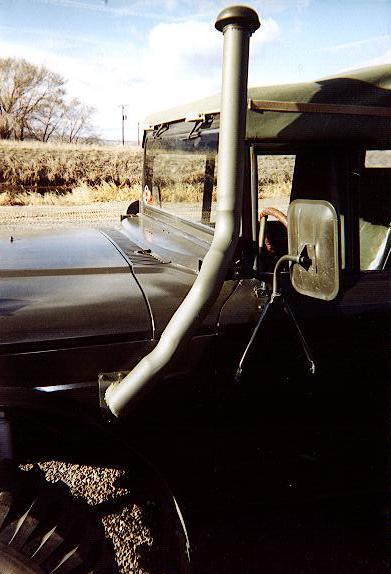
Pictures #1-5, Show the truck with the troop seats installed. The 5-tons in the background of pictures 1 & 2 are used by my Fire Department for 1000 gallon brush/ wildland tankers for the down range portion, 400 square miles, of the Yakima Firing Center.


Pictures #6 & 7, This is the relocation of my battery box. I added a 2 ½ tons Passenger seat to the inside of my, so I could seat three people. The battery box had to be moved. I also rebuilt the inside of the box and added new trays and mountings. The 12V slave was added to battery # 1 so I could jump my wifes car in a pinch. I found out the hard way after doing this, swap the batteries around, or the one will boil. The slave came off my 12V (converted) M38A1 before I sold it. Since I had jumper cables to fit it.


Picture #8, Shows the Civilian spark plug wires I use. These had to be modified to fit the MIL distributor housing by using a conglomeration of different parts. They are water proof and work real nice.
Picture #9, The 30 cal. Ammo can mounted to the fire wall is the air box for the heater. It works out nice because I can open the lid and clean out any leaves that get in. The heater is a 30,000 BTU unit from a 2 ½ ton and the elbow mounted just under the air box contains the damper to supply fresh air to the heater unit.
Picture #10, The 30,000 BTU heater mounted to the underside of my dash and the air distribution box for defroster or floor heat. The heater box was cut down a few inches to fit. The distribution box was mounted backwards to get the main hose to line up. In a deuce the heater comes from the drivers side. The defroster ducts not shown where made from 3 ABS plastic pipe cut in half length wise and capped on either end. I would have used duece ones but AM General and Kaiser welded them in.
Picture #11, Drive line swap done using Dodge parts from a WWII WC 62/63 6X6. Parts include new companion flange, U joint, and slip yoke. The stock 715 drive shaft was retained. This makes the truck run a lot more quiete, dont know yet if it will make the NP200 run cooler. Didnt hurt on the gas mileage though.
Picture #12, Home made spare tire carrier. This was made from a fence post the G.I.s use for spreading consentina wire (razor wire) for perimeter defense and some angle iron.
Picture #13, When I installed my new taillights I made some brackets to move the lights up and out on the rear bumper. This way they do not hang down too low and foul up the departure angle. I do have a Military archive photo of an M715 that was done this way.
This photo also shows a good close up of the delineator plates I added to the tailgate. The one on the passenger side covers up a big hole that was cut in the tailgate for a drafting hose, when this truck was owned by the Cowiche Fire Department. To make matters worse they cut the hole right where the tailgate bumper went.
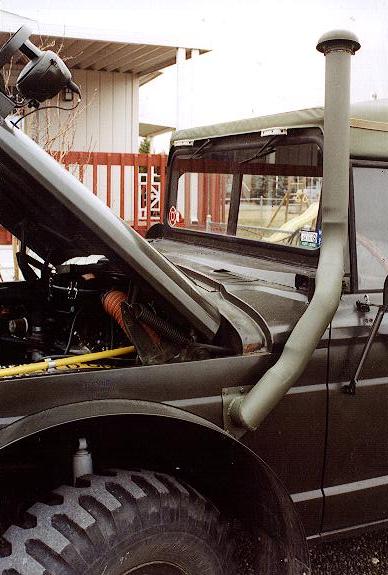
Pictures #14, 15 & #16, The front intake fording pipe was made by a local muffler shop for me out of 3 aluminized pipe. I gave them pictures and the installation instructions for the stock pipe and they made it. I made the fender plate out of sheetmetal and supplied the cowl
pillar brackets. They did the welding as well. All in all the front pipe only cost $40.00.
* Note the early style air filter housing.
Pictures #17 & 18, Tail pipe extension with out the heat guard installed yet. This was made by the same muffler shop out of 2 ½ aluminized pipe. My exhaust system now boasts the stock 2 pipe from the manifold to the front muffler flange and 2 ½ pipe from the front muffler flange to the tip of the extension. It also uses a high flow 2 ½ Summit turbo muffler. With this mod I can extra horses, even with the extra length of pipe at the rear.

Pictures #19 & 20, Exhaust extension with heat guard. I used expanded metal and 3 muffler clamps. The pipe mounts to the body via two 20lbs. Fire extinguisher brackets welded to the pipe.

Pictures #21 & 22, Dash layout. The yellow transmission caution plate I bought from RAPCO, all the other data plates are original. I added and extra gun bracket to the dash, since my rig seats three in the cab. The yellow decal on the glove box door tells of the bellhousing drain plug being stored in there.
* Note heater control box mounted to the left of the brake lever. I made this from a standard weather proof conduit box and added the fan switch, indicator light, and damper pull cable. I also did the stenciling. Looks sorta like the gas heater control box doesnt it?

Picture #23, Fording cable/data plate and Good Driver decal. The warranty decal is original. I added the late model turn switch, Good Driver decal and, to the lower left corner of the picture, an air filter monitor. When the filter gets clogged or restricted the indicator turns red. I had to add an extra barb fitting to the clean air side of my air filter housing for this. The fording cable is from a M37 Dodge ($6.00). The data plate is from an M38A1 ($8.00).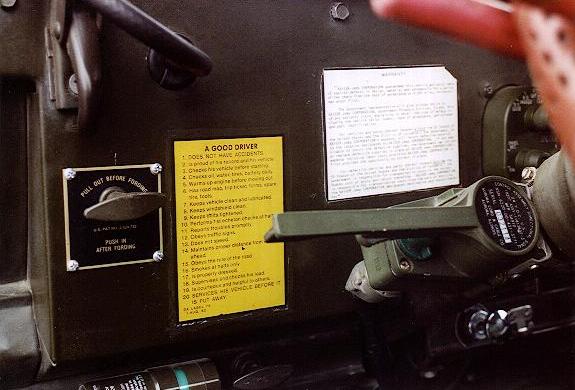
Picture #24, This is my radio box mounted on the floorboard under the passenger seat. It is waterproof and contains an AM/FM radio and C.B. radio. The box is made from an ammo can with an addition on the back for all of the wires. It stays waterproof due to me wiring it using cannon connectors on the back side and an internal wiring block. I also use a remote power switch to turn my radio on and have the volume and channel preset. The box is mounted on
rubber vibration dampers as well.
Picture #25, This is what my trucks intake system looked like before I added the new early model type air filter housing. At this point the fording valves are installed and the governor has been removed. The vacuum line for the governor was rerouted to the air cleaner monitor that I mounted on the dash.
* NOTE: The electronic flasher for the turn signals mounted right where the distribution box used to be.
* Also NOTE: The fittings and hose for the engine oil cooler just behind the alternator. There is also a freeze plug block heater in there as well.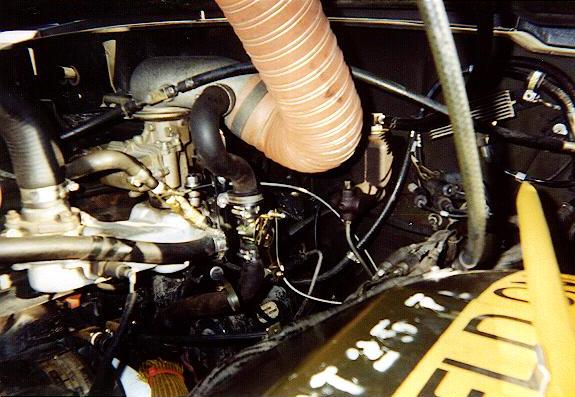
Picture #26 & 27, New early style air filter housing. Fording valves, air inlet hose and oil cooler lines. The PVC vent line valve was purchased from Ace Hardware. Its just a small appliance ball valve modified to accept a cable ($6.00). The crankcase vent is a pull to close ¾ heater valve purchased at an auto parts store. I paid extra for it to come with a mounting for the cable ($35.00). I also made a bracket out of flat bar to come off the carb. Mounting bolt. This holds the cable for the PVC valve ant the Crankcase vent hose and
valve. The fording valve pull cable is from a M37 Dodge.
* Note that the cable barely fit.

Picture #28, Close up view of the engine oil cooler, modern turn signal light and the grill guard. I wanted some extra protection for my radiator so I added some expanded metal to the grill guard. This is aluminum from a storm door. I cut it to fit real tight in the crease made by the vertical bars and horizontal tube of the stock grill guard. It is then bolted on the front side by using my bridge plate(passenger side) and two half U bolts (drivers side).
Picture #29, THE FINISHED PRODUCT!!
* Note radiator cover made for fast warm up during the winter months.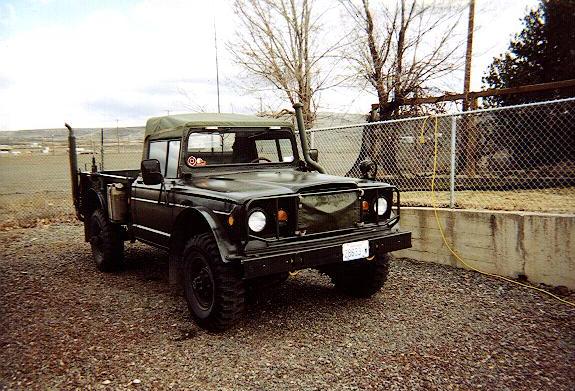
Now for some further notes on the fording kit items. I paid a total of $130.00 for the both pipes and to have them bent/welded. This price also included the muffler installation. I paid $20.00 for the Muffler and then another $6.00 for the expanded Metal. I could not find a reasonably priced stock intake at the time and the $162.00 SECO wanted for the one they had did not seem right. I did not want to use the stock exhaust stack do to the loss of
horse power it would have caused.
A note to those who have the fording kit installed. Unhook the hose that goes between to air filter and stack. Youll get a lot more power. If you need it, then hook it up. You have to get out anyway to install the bellhousing plug or loosen the fan belts.
I ended up going with the early model air cleaner do to it being a lot easier to hook up to the intake pipe. If I used the one I had there would have been a mile of 3 flex hose under the hood. Besides the early model filter can be purchased at NAPA. The late model type is a special order and costs more. If you can find one! I also got the filter housing for $20.00 from Saturn Surplus through E Bay. Brand new in the box oil paper and plastic wrap and all.